
The box arrived on a Tuesday afternoon and I sat there staring at it for ten minutes before I opened it. Not because I didn’t know what to do — I’d watched enough YouTube videos by then — but because Ray had called me the day before and said, “Before you plug anything in, make sure you actually know your load list.” He’d been installing backup power systems professionally for 14 years and his single consistent complaint was that homeowners set things up backward: they plug the unit in first, then figure out what they need it to do.
He was right! And this guide is built around that principle. Setup first means knowing your loads, your placement, and your app settings before a single cable gets connected.
If you’re still deciding whether to buy the DELTA Pro at all, the how the DELTA Pro compared to the other units I tested post is a better starting point. If you’ve already decided and want to know if the price makes sense, whether the DELTA Pro is worth the price covers that. This guide assumes you have the unit in hand and want to set it up correctly.
Step 1: Build Your Critical Load List Before You Touch the Unit
This is the step most people skip. Don’t.
Write down every appliance you plan to run during an outage. For each one, find the wattage — it’s on the label on the back or bottom of the appliance, or in the owner’s manual. If you can’t find it, search “[appliance model] wattage” and you’ll get there.
The loads I run on mine, for reference:
- Refrigerator (Frigidaire 13.5 cu ft): 97W average, 620W startup spike
- CPAP without humidifier: 30W
- LED lighting, 3 rooms: 36W
- Phone and laptop charging: ~65W combined
- Window AC unit (6,000 BTU, bedroom only): 550W running, ~1,800W startup spike
Total average draw: roughly 280–300W. Startup spike from the AC: up to 1,800W.
That last number matters for the DELTA Pro specifically. The unit has a 3,600W AC output and handles startup surges up to 7,200W via X-Boost. Your fridge compressor, window AC, and similar motors all create startup spikes that exceed their running wattage significantly. The DELTA Pro absorbs these without tripping. Cheaper inverters don’t, and you’ll find that out at the worst possible moment.
Once you have your load list, add up the running watts and multiply by the number of hours you want coverage. That tells you whether the DELTA Pro’s 3,600Wh is enough for your situation — or whether you need to think about an expansion battery or solar input.
Step 2: Decide Where the Unit Lives
The DELTA Pro weighs 99 pounds. It has wheels and a telescoping handle, and one person can move it — but it’s not something you want to carry up or down stairs. Pick its home location before delivery if you can.
A few things Ray told me to think about:
Temperature matters more than most people realize. The DELTA Pro operates between 14°F and 113°F, but its optimal range for battery health is 32°F to 86°F. A garage in Florida in August hits 93°F by midday. The unit will work in that heat, but storing it there all summer shortens the battery’s long-term cycle life faster than storing it indoors. If possible, keep it in a climate-controlled space and wheel it out only when needed.
Proximity to your critical appliances matters. The DELTA Pro’s AC output cables are not infinitely long. Position it where the refrigerator cable reaches without a daisy-chain of extension cords. Long runs of thin extension cord create resistance and heat that reduce efficiency and can be a fire risk at high draw.
You need a ventilation path for the cooling fan. Don’t shove it into a tight cabinet or closet. The fan runs actively under load and needs airflow. A foot of clearance on the sides and rear is plenty — just not zero.
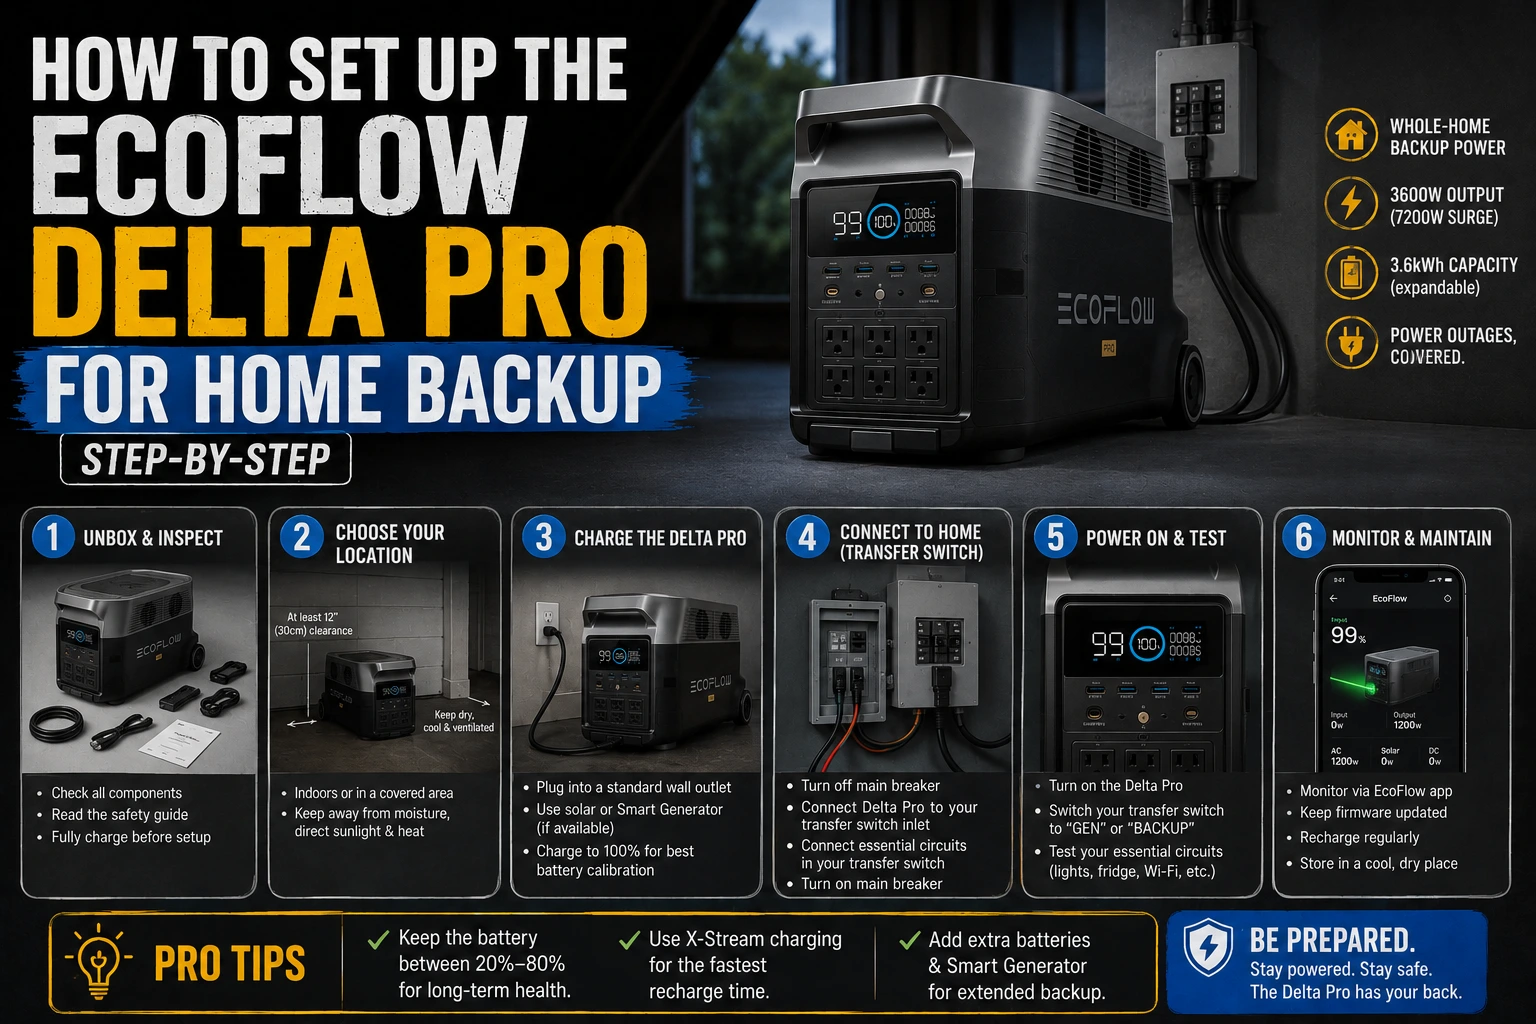
Step 3: Initial Charge and First-Run Setup
When the DELTA Pro arrives, it will be at a partial charge — typically 40–70%. Before you run any serious load, charge it to 100% at least once using the AC wall adapter.
Plug in the included Anderson-to-AC adapter and connect to a standard 120V outlet. With X-Stream fast charging enabled, you’ll go from a typical delivery state to full in approximately two hours. Without X-Stream (standard charge mode), expect closer to four to five hours.
While it’s charging the first time, download the EcoFlow app on your phone (iOS and Android — both work well, iOS is marginally more polished in my experience). Connect the DELTA Pro via Bluetooth first, then link it to your home Wi-Fi through the app. Once it’s on Wi-Fi, you can monitor and control it remotely — which is exactly what you want the night of an outage when the unit is in the garage and you’re in bed.
Step 4: Configure These App Settings Before Your First Outage
Most people open the app, glance at the battery percentage, and call it done. That’s a mistake. There are three settings worth configuring properly before you need the unit in anger.
Charge level limit (Storage Mode). If you’re not expecting an outage imminently — say, it’s January in Jacksonville and hurricane season is months away — set the charge ceiling to 80%. Keeping a lithium battery at 100% for extended periods stresses the cells. EcoFlow’s battery care documentation recommends 80% for long-term storage. Drop this limit in the app and the unit will stop charging at 80% automatically. Bump it back to 100% when storm season starts.
X-Boost mode. This is the feature that allows the DELTA Pro to run appliances that nominally exceed its inverter rating by algorithmically managing the current draw. It’s on by default but worth confirming. Navigate to Settings → AC in the app and verify X-Boost is enabled. If you’re planning to run a window AC or microwave, you want this active.
AC output standby timeout. By default, the DELTA Pro turns off its AC output after a period of inactivity to conserve power. If your fridge is connected and the compressor cycles off for 20 minutes, the unit will shut down the AC output and your fridge loses power. Set this timeout to the maximum available setting — or disable it entirely — if you’re using the unit for refrigerator backup. This one bit me during my first overnight test and I only caught it because I was watching the app.
Step 5: Set Up Solar Input (If You’re Going That Route)
Ray’s standing recommendation for anyone in Florida or Texas: don’t buy the DELTA Pro without planning solar from day one. The unit alone is a one-to-two-night solution. The unit with solar input is a multi-day solution.
The DELTA Pro accepts up to 1,600W of solar input via its XT60 and MC4 connectors. In practice, two 200W panels on a clear Florida day with good angle deliver around 300–350W of actual input. Three 200W panels get you closer to 480–520W, which can recover roughly 2,000–2,500Wh over a six-hour peak sun window.
Panel placement tips:
- Angle panels at roughly your latitude in degrees from horizontal. Jacksonville is at 30°N, so aim for 30° tilt.
- South-facing is optimal. East or west-facing costs you 15–25% of daily production.
- Partial shade on even one panel disproportionately reduces the whole array’s output. Position to avoid afternoon tree shadows.
- Use the EcoFlow app’s solar input monitor to verify real-time panel performance after connecting. If you’re getting less than 150W per panel on a clear day, check your connections and angle before assuming the panels are underperforming.
For what I actually found across six months of real outage use with this setup, the DELTA Pro’s real-world outage performance post has the full breakdown.
Step 6: Run a Practice Load Test Before You Actually Need It
Once everything is set up and the unit is at 100%, run a deliberate test before storm season. Plug in your critical appliances, let them run for two hours, and watch the app. Confirm:
- The watt draw matches what you calculated in Step 1
- The projected remaining runtime is in line with your expectations
- The AC standby timeout is not cutting power to the fridge unexpectedly
- Solar input is showing correctly if panels are connected
This is what Ray calls “finding out your setup is wrong on a Tuesday instead of during a Category 2.” Takes two hours and could save you a refrigerator full of food.
One Thing I’d Do Differently
I set up everything correctly except the AC standby timeout. That one misconfiguration cost me a scare during my first outage when I checked the fridge at 3 a.m. and found it warmer than it should have been. Five seconds in the app fixed it, but it was a preventable mistake.
Run through Step 4 carefully. Those three settings make a real difference.

Lived through four major grid outages since 2021 — including Hurricane Ian (2022) and Helene (2024). Spent over $6,200 testing portable power stations and comparing them against whole-home standby generators before finding a setup that actually works. Not an electrician. Not sponsored by anyone. Just a homeowner who got it wrong the first time and documented everything the second time.
Why I started this blog: I wasted $3,400 on the wrong power station during Ian prep and I couldn’t find a single blog that gave me real runtime numbers — not the ones printed on the box. I decided to test everything myself and write it down.
What I do: I run real-world runtime tests on portable power stations and standby generators. I track how long they actually power a fridge, window AC, CPAP, and phone chargers — not under ideal lab conditions, but during Florida summers with actual loads. I compare real purchase prices, warranty experiences, and manufacturer support against what homeowners actually need after a storm.